
How To Build a Slurm HPC Cluster on a Single Machine
In large-scale data analysis, using a queue job/distributed system is essential. Therefore, we need a mechanism that allows users to access cluster resources and request appropriate CPU, RAM, and GPU for their tasks. If they use more memory than they requested, the simplest solution is to kill the job. This helps avoid out-of-memory issues where the computer would freeze. Slurm is the most common cluster setup, but understanding how to create a Slurm cluster is not easy. Therefore, I created this blog series to guide you through setting it up on a single machine first, then scaling it later and using it effectively and efficiently.
This is Part 1 of a 3-part series where we'll build a complete Slurm cluster from scratch. In this first post, we'll cover the fundamentals by setting up a single-node Slurm cluster and understanding the core concepts.
Series Overview
- Part 1 (This Post): Introduction, Architecture, and Single Node Setup
- Part 2: Scaling to Production with Ansible
- Part 3: Administration and Best Practices
Why Slurm?
When it comes to job scheduling in HPC environments, several options exist including PBS, Grid Engine, and IBM's LSF. However, Slurm (Simple Linux Utility for Resource Management) stands out for several compelling reasons:
- Open Source: Free to use with a large, active community
- Scalability: Designed to scale from small clusters to the world's largest supercomputers
- Flexibility: Fine-grained control over job scheduling, resource allocation, and priority settings
- Integration: Works seamlessly with MPI, distributed computing frameworks (Spark, Ray, Dask), and monitoring tools
- Performance: Optimized for high throughput with minimal overhead
Understanding Slurm Architecture
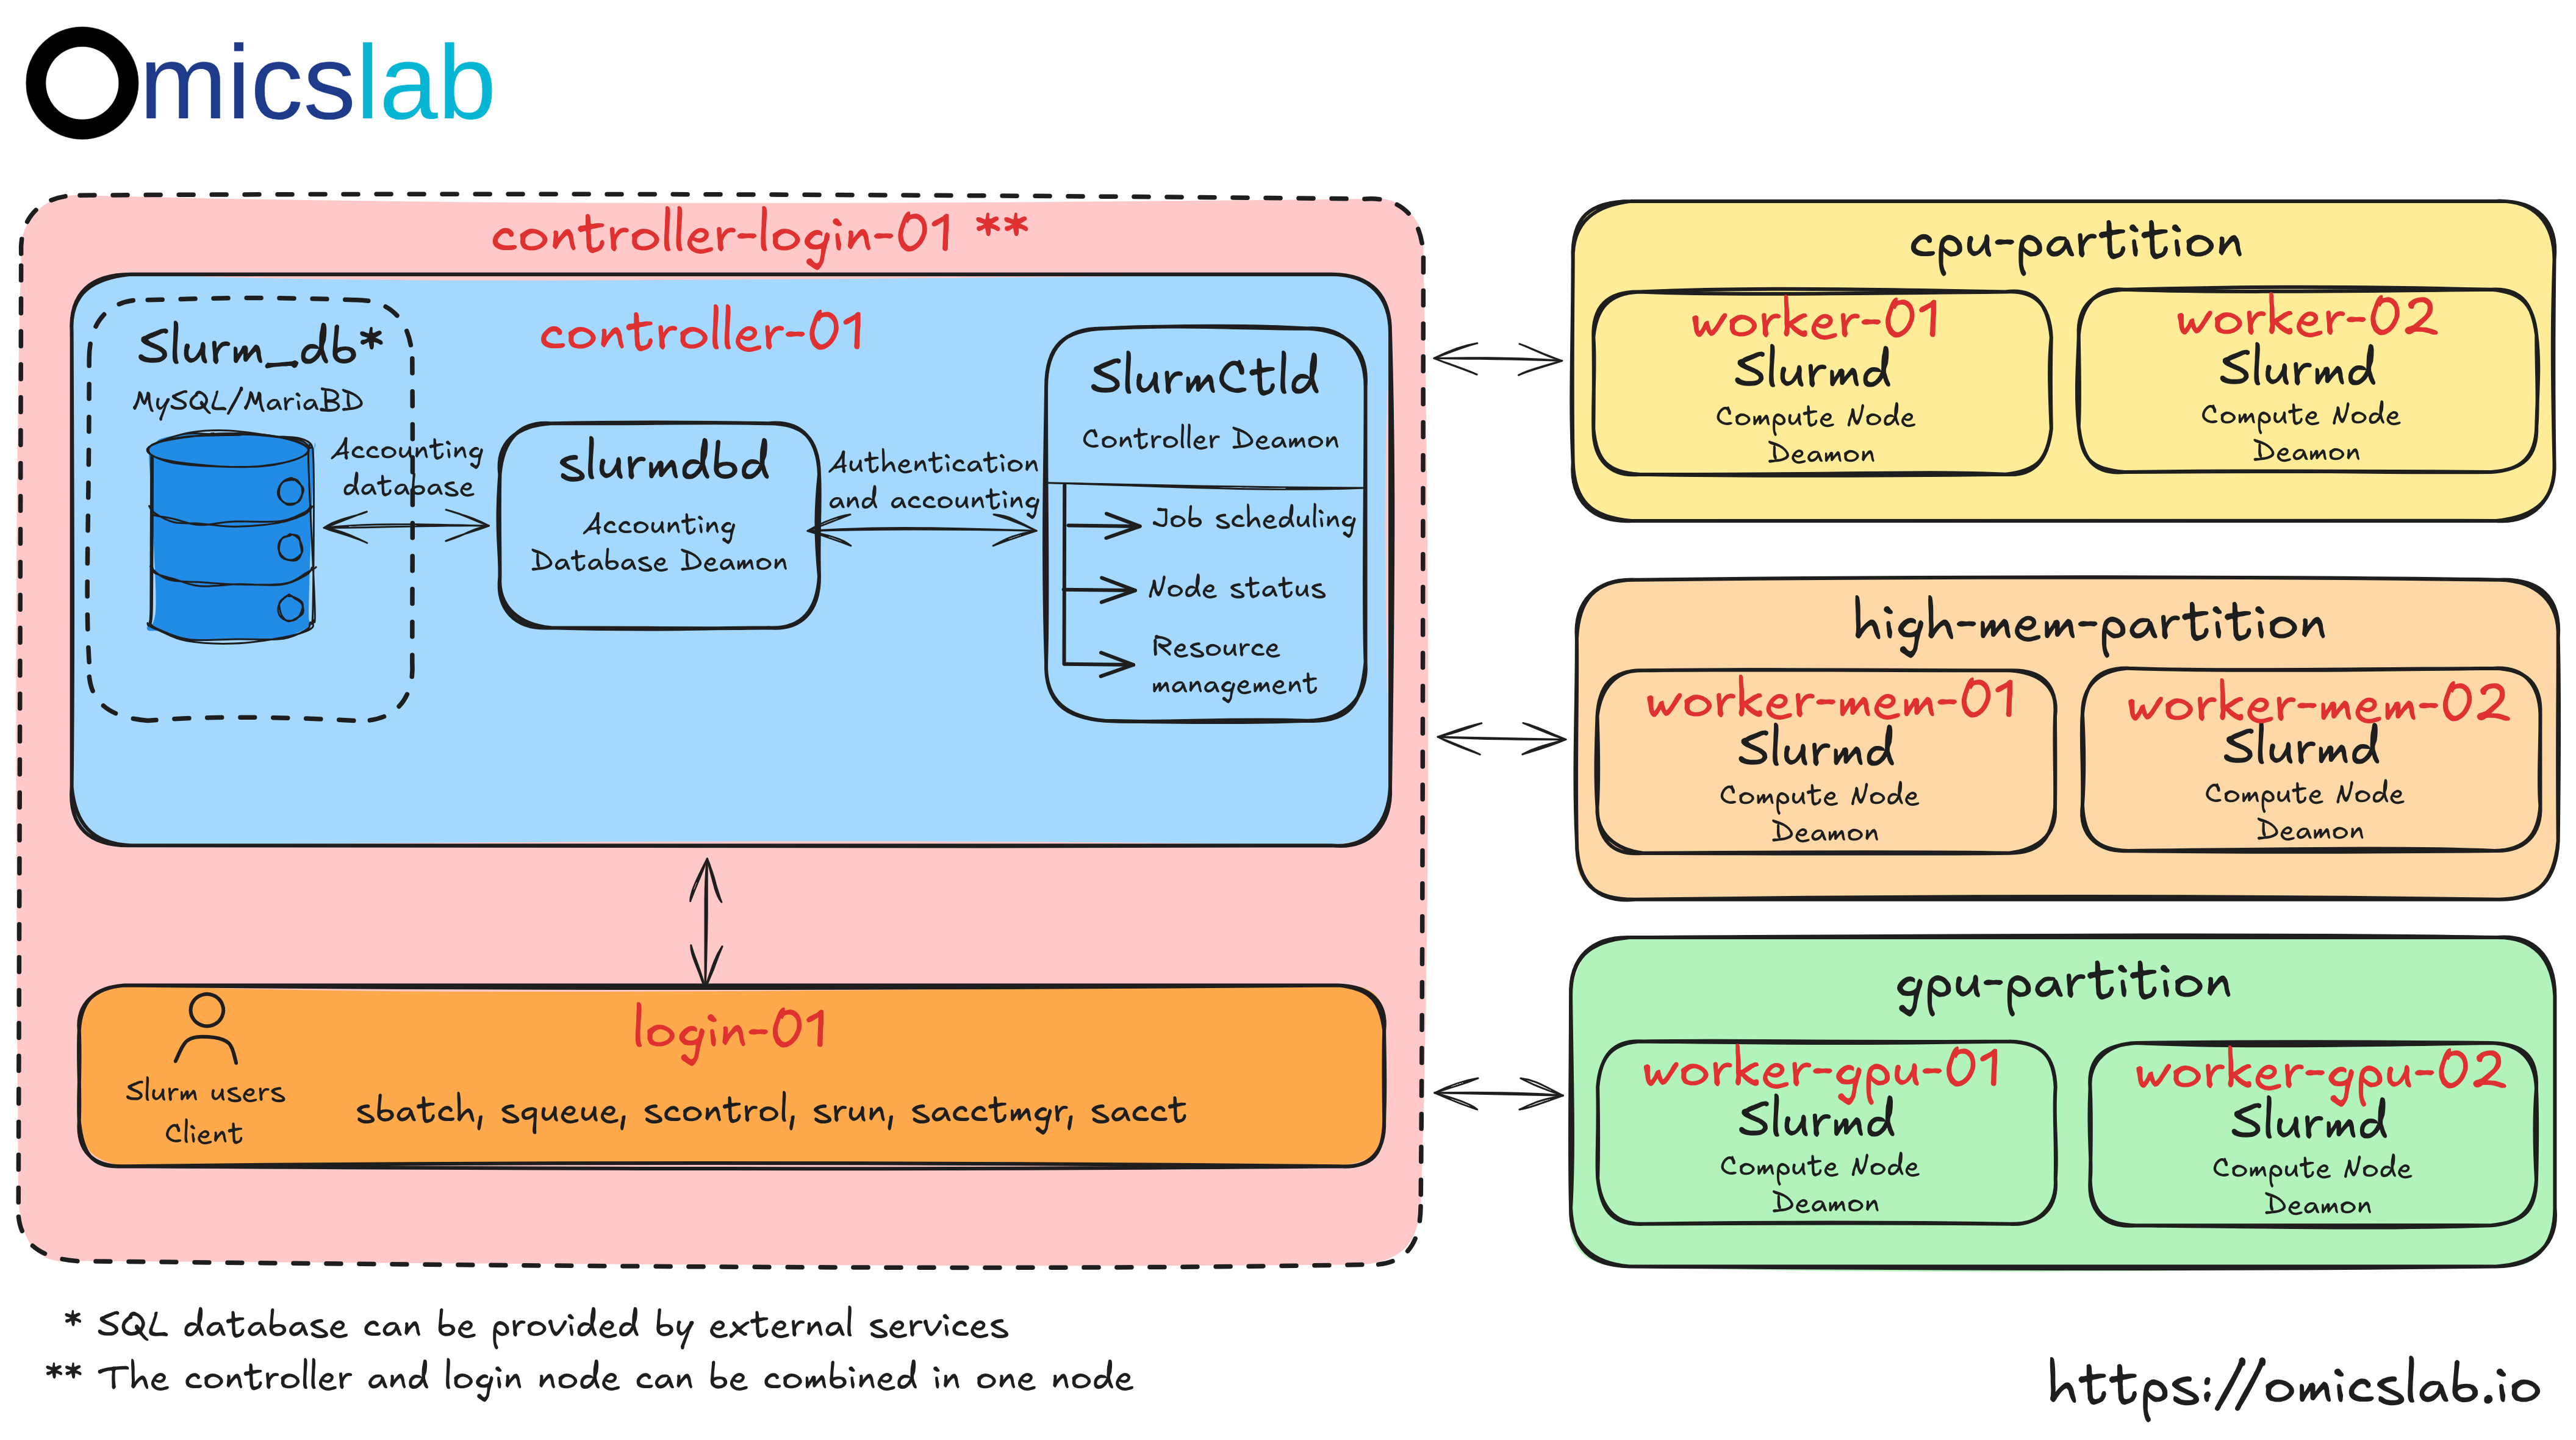
Figure 1: The standard architecture of a multi-node Slurm cluster
Core Nodes
The main function of Slurm or any cluster is to connect computing machines with large numbers of CPUs, memory, and GPUs. It has a management system where users can request computing resources (16 cores, 32GB RAM, for example). It finds available computing machines and allocates resources to users. How can we design a system to do this at a high level?
We can divide it into 3 types of machines: login nodes, controller nodes, and compute nodes:
Controller nodes: They act as the controller, receive requests from users, allocate resources, and manage resources. Additionally, it's good practice to configure them with a database (SQL database) to store accounting information. This helps track who ran jobs, how they used computing resources, etc.
Login nodes: They act as the gateway, usually accessed via the public network. Users can SSH to login to the machine and request compute resources. The login node sends the request to the controller to decide whether there are available computing resources or not. Then it allocates resources or asks users to wait. Normally, without controller permission, users cannot "stand" on the compute nodes where the large resources actually reside.
Compute nodes: Simply have large resources and connect to the controller to wait for allocation.
Core Components
From the previous section and Figure 1, we can now identify the related services (software) that help the cluster connect together and work properly
slurmctld (Controller Daemon): The brain of the cluster, running on the controller node. It handles job scheduling, resource tracking, and communicates with compute nodes.
slurmd (Node Daemon): Runs on compute nodes to execute jobs and report status back to the controller.
slurmdbd (Database Daemon): Optional but recommended for storing job accounting data, resource usage tracking, and fair-share scheduling.
| Node Type | Services | Purpose |
|---|---|---|
| Login | Slurm clients | User access point for job submission |
| Controller | slurmctld | Manages job scheduling and resources |
| Compute | slurmd | Executes submitted jobs |
| Database | slurmdbd, MySQL/MariaDB | Stores accounting data |
- For small to medium clusters, the login node and controller are usually configured on a single machine while compute nodes should be independent
- When combining all services on a single machine, the key issue is that users can bypass the Slurm service and use compute resources directly
- For a deeper understanding of Slurm architecture, check our Slurm Documentation.
All In One - Single Node Setup
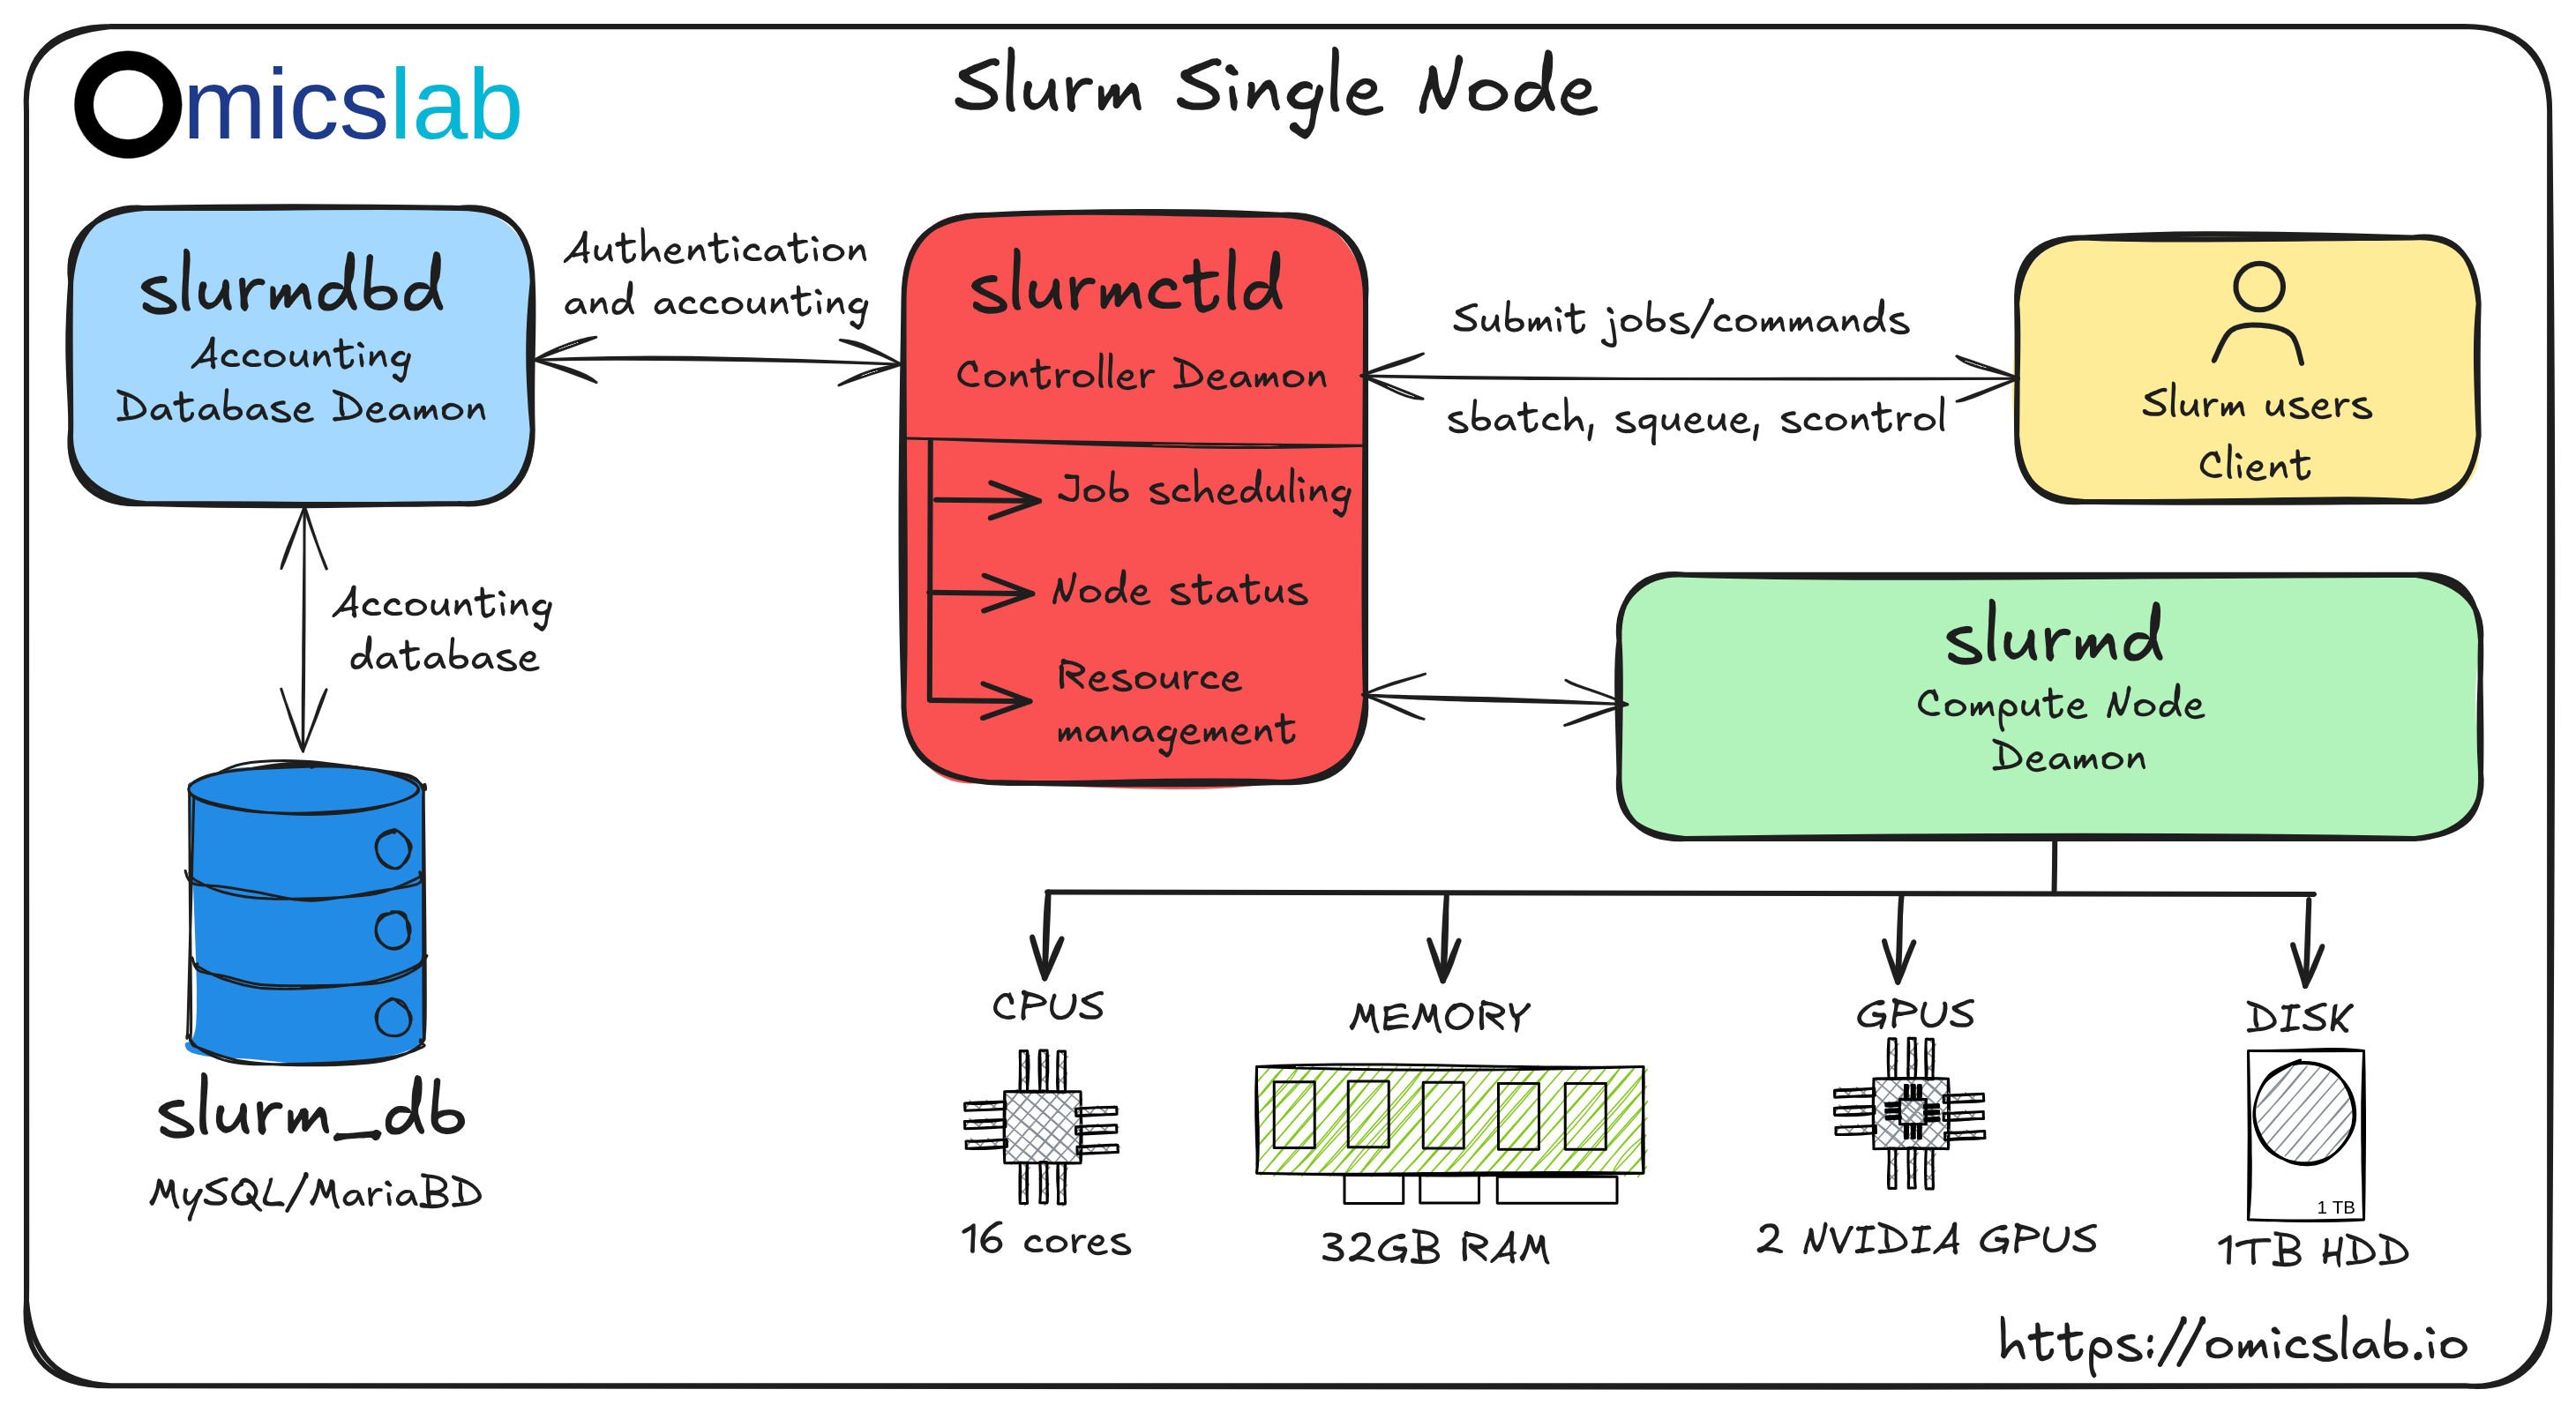
Figure 2: The Single Node Slurm Cluster Architecture
Starting with a single-node setup helps you understand how Slurm works before scaling up. This approach is perfect for learning and local development. For personal usage, you can configure it to use Slurm for resource allocation. According to Figure 2, we will now install everything on a single machine.
- This setup runs on Ubuntu 20.04 and includes all standard Slurm features. Note that this configuration is for learning purposes - for production environments, you'll want the multi-node setup covered in Part 2.
- Instead of requiring users to be aware of job submission, they can use resources directly. Buying a small machine for the controller is quite cheap and also reduces the effort needed to manage a single workstation.
Virtual Machine and Docker
To manually set up the single-node Slurm cluster, instead of using your own computer, it is better to use a virtual machine or Docker:
Vagrant:
- To set up the virtual machine, install Vagrant: https://developer.hashicorp.com/vagrant
- Configure the new virtual machine: https://developer.hashicorp.com/vagrant/tutorials/networking-provisioning-operations/getting-started-provisioning
- To reproduce this tutorial, change the virtual machine box to "alvistack/ubuntu-20.04"
Docker:
- Install Docker: https://docs.docker.com/engine/install
- Create the container with base image:
ubuntu:20.04 - For Docker, you are the root user, so you don't need to use
sudoto run commands
Install Slurm dependencies
First, install the required Slurm components:
sudo apt-get update -y && sudo apt-get install -y slurmd slurmctldVerify the installation:
# Locate slurmd and slurmctldwhich slurmdwhich slurmctld# Output: /usr/sbin/slurmctldConfiguring slurm.conf
The slurm.conf file is the heart of your Slurm configuration. This file must be identical across all nodes in a cluster (but for now, we just have one node).
Create your slurm.conf:
cat <<EOF > slurm.conf# slurm.conf for a single-node Slurm clusterClusterName=localclusterSlurmctldHost=localhostMpiDefault=noneProctrackType=proctrack/linuxprocReturnToService=2SlurmctldPidFile=/run/slurmctld.pidSlurmctldPort=6817SlurmdPidFile=/run/slurmd.pidSlurmdPort=6818SlurmdSpoolDir=/var/lib/slurm-llnl/slurmdSlurmUser=slurmStateSaveLocation=/var/lib/slurm-llnl/slurmctldSwitchType=switch/noneTaskPlugin=task/none
# TIMERSInactiveLimit=0KillWait=30MinJobAge=300SlurmctldTimeout=120SlurmdTimeout=300Waittime=0
# SCHEDULINGSchedulerType=sched/backfillSelectType=select/cons_tresSelectTypeParameters=CR_Core
# ACCOUNTING (not enabled yet)AccountingStorageType=accounting_storage/noneJobAcctGatherType=jobacct_gather/noneJobAcctGatherFrequency=30
# LOGGINGSlurmctldDebug=infoSlurmctldLogFile=/var/log/slurm-llnl/slurmctld.logSlurmdDebug=infoSlurmdLogFile=/var/log/slurm-llnl/slurmd.log
# COMPUTE NODES (adjust CPUs and RealMemory to match your system)NodeName=localhost CPUs=2 Sockets=1 CoresPerSocket=2 ThreadsPerCore=1 RealMemory=1024 State=UNKNOWN
# PARTITION CONFIGURATIONPartitionName=LocalQ Nodes=ALL Default=YES MaxTime=INFINITE State=UPEOF
sudo mv slurm.conf /etc/slurm-llnl/slurm.confStarting Services
Start the Slurm daemons:
# Start slurmd (compute daemon)sudo service slurmd startsudo service slurmd status
# Start slurmctld (controller daemon)sudo service slurmctld startsudo service slurmctld status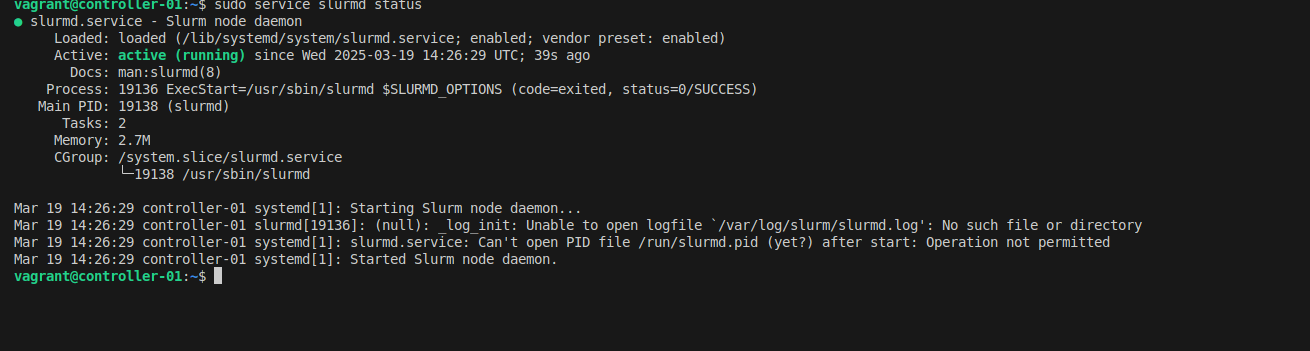
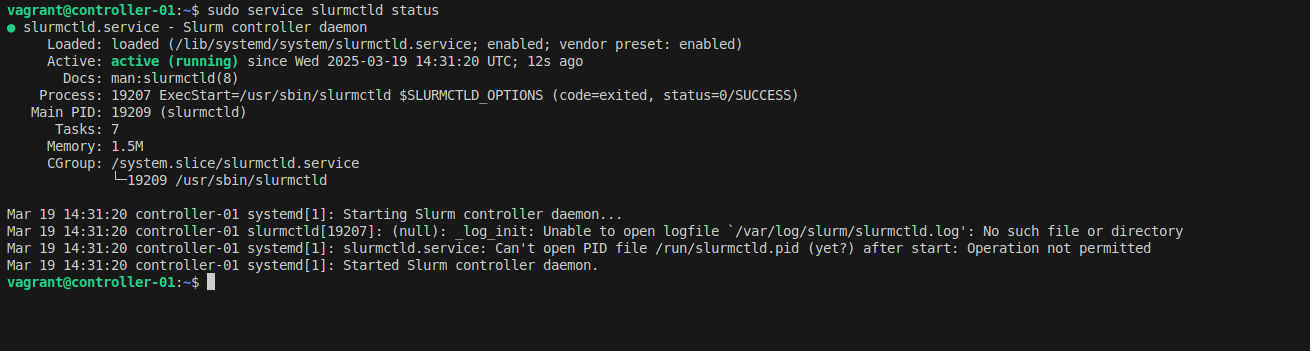
Test your setup by submitting a simple interactive job:
srun --mem 500MB -c 1 --pty bash
# Check job detailssqueue -o "%i %P %u %T %M %l %D %C %m %R %Z %N" | column -tEnable Resource Limitation With cgroups
Without proper cgroup configuration, jobs can exceed their allocated resources, potentially causing system instability or crashes. The job scheduler will accept resource limits, but won't actually enforce them.
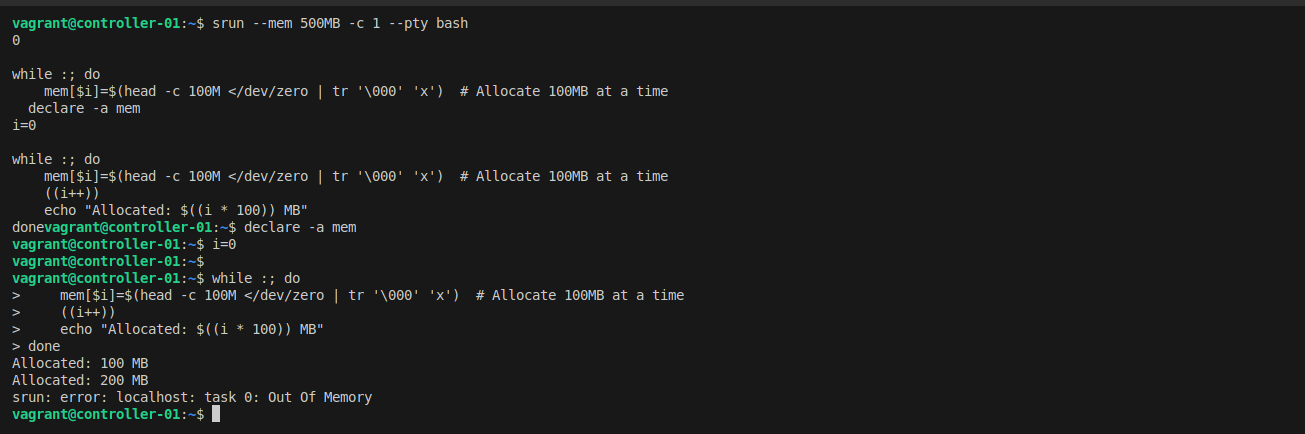
Let's test this problem first. Submit a job requesting 500MB and try to allocate much more:
srun --mem 500MB -c 1 --pty bash
# Try to allocate 1GB of memory (exceeding the 500MB limit)declare -a memi=0while :; do mem[$i]=$(head -c 100M </dev/zero | tr '\000' 'x') ((i++)) echo "Allocated: $((i * 100)) MB"doneBefore submitting the job, memory usage is less than 200MB:

After allocating 1GB, the job is not killed due to missing control group (cgroup) configuration:

You'll notice the job continues running even after exceeding 500MB - that's the problem!
Now let's fix it with cgroups:
cat <<EOF > cgroup.confCgroupAutomount=yesCgroupMountpoint=/sys/fs/cgroupConstrainCores=yesConstrainRAMSpace=yesConstrainDevices=yesConstrainSwapSpace=yesMaxSwapPercent=5MemorySwappiness=0EOF
sudo mv cgroup.conf /etc/slurm-llnl/cgroup.confUpdate slurm.conf to use cgroup plugins:
sudo sed -i -e "s|ProctrackType=proctrack/linuxproc|ProctrackType=proctrack/cgroup|" \ -e "s|TaskPlugin=task/none|TaskPlugin=task/cgroup|" /etc/slurm-llnl/slurm.confEnable cgroup in GRUB and reboot:
sudo sed -i 's/^GRUB_CMDLINE_LINUX="/GRUB_CMDLINE_LINUX="cgroup_enable=memory swapaccount=1 /' /etc/default/grubsudo update-grubsudo rebootAfter reboot, restart Slurm services:
sudo service slurmctld restartsudo service slurmd restartNow test again with the same memory allocation script - this time, the job will be killed when it exceeds the limit!
Enabling Accounting
Job accounting is essential for:
- Tracking who is using resources
- Monitoring job completion and failures
- Enforcing resource limits per user/group
- Fair-share scheduling
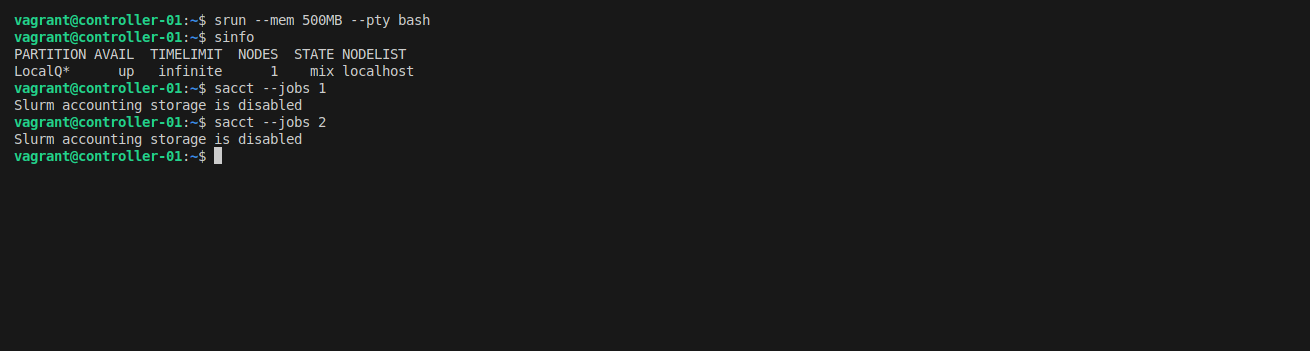
Install the required packages:
sudo apt-get install slurmdbd mariadb-server -yCreate the database and user:
sudo service mysql start
sudo mysql -e "CREATE DATABASE slurm_acct_db;"sudo mysql -e "CREATE USER 'slurm'@'localhost' IDENTIFIED BY 'slurm';"sudo mysql -e "GRANT ALL PRIVILEGES ON slurm_acct_db.* TO 'slurm'@'localhost';"sudo mysql -e "FLUSH PRIVILEGES;"Verify the database was created:
sudo mysql -e "SHOW DATABASES;"sudo mysql -e "SELECT User, Host FROM mysql.user;"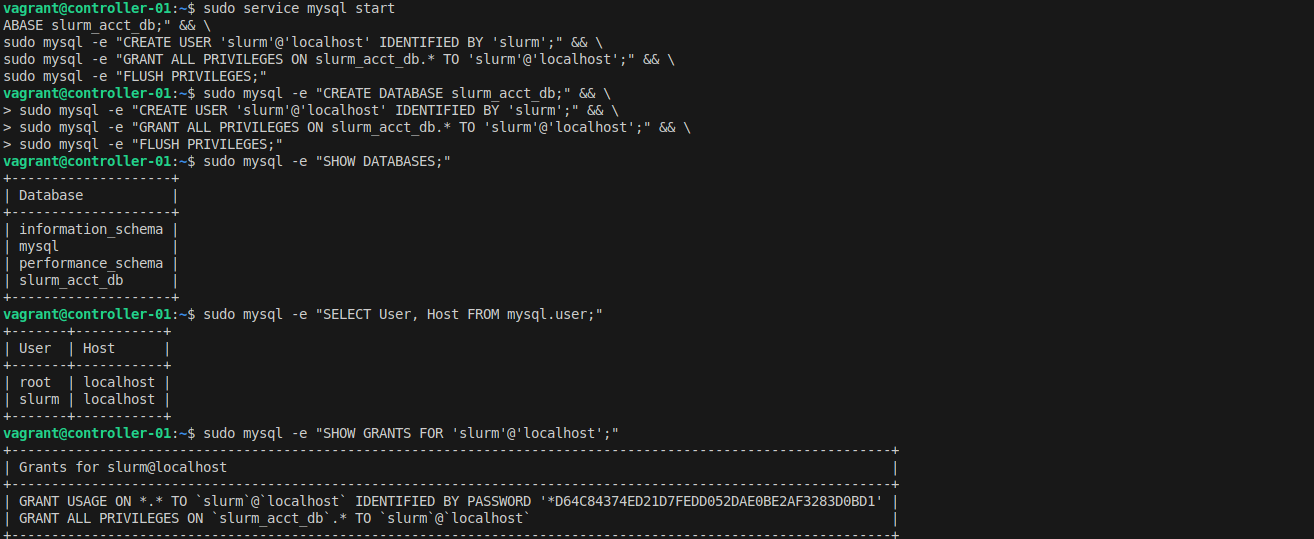
Configure slurmdbd:
cat <<EOF > slurmdbd.confPidFile=/run/slurmdbd.pidLogFile=/var/log/slurm/slurmdbd.logDebugLevel=errorDbdHost=localhostDbdPort=6819
# DB connection dataStorageType=accounting_storage/mysqlStorageHost=localhostStoragePort=3306StorageUser=slurmStoragePass=slurmStorageLoc=slurm_acct_dbSlurmUser=slurmEOF
sudo mv slurmdbd.conf /etc/slurm-llnl/slurmdbd.confsudo service slurmdbd startUpdate slurm.conf to enable accounting:
sudo sed -i -e "s|AccountingStorageType=accounting_storage/none|AccountingStorageType=accounting_storage/slurmdbd\nAccountingStorageEnforce=associations,limits,qos\nAccountingStorageHost=localhost\nAccountingStoragePort=6819|" /etc/slurm-llnl/slurm.conf
sudo sed -i -e "s|JobAcctGatherType=jobacct_gather/none|JobAcctGatherType=jobacct_gather/cgroup|" /etc/slurm-llnl/slurm.conf
sudo systemctl restart slurmctld slurmdAdd your cluster and user to accounting:
# Add clustersudo sacctmgr -i add cluster localcluster
# Add account for your usersudo sacctmgr -i add account $USER Cluster=localcluster
# Add your user to the accountsudo sacctmgr -i add user $USER account=$USER DefaultAccount=$USER
sudo systemctl restart slurmctld slurmd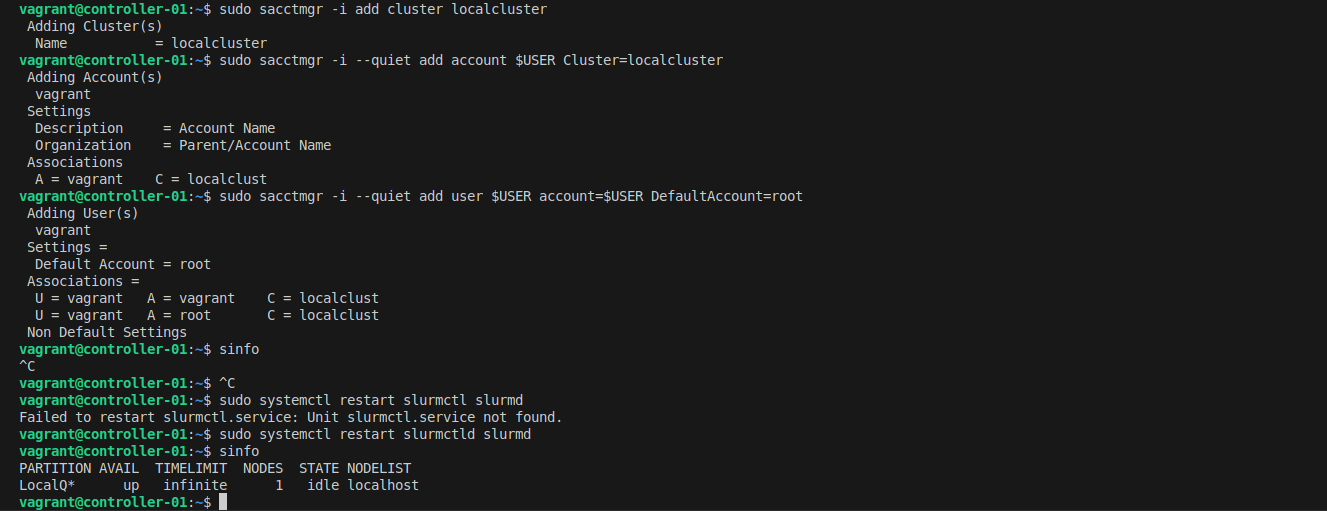
Now test accounting by submitting a job and viewing its details:
# Submit a test jobsrun --mem 500MB -c 1 hostname
# View accounting informationsacct
Key Takeaways
In this first part of our series, we've covered:
- Why Slurm: Understanding the advantages of Slurm over alternatives
- Architecture: Core components (slurmctld, slurmd, slurmdbd) and their roles
- Basic Setup: Installing and configuring a single-node cluster
- Critical cgroups: Why resource limiting is essential (and how to enable it)
- Accounting: Setting up job tracking and resource monitoring
What's Next? In Part 2, we'll take this knowledge and scale to a multi-node production cluster using Ansible automation. We'll add monitoring with Grafana, alerting via Slack, and shared storage with NFS.
References
1.Slurm Overview — Official documentation for Slurm workload manager
2.NVIDIA/deepops — Open-source cluster deployment toolkit (BSD-3-Clause License)
3.elasticluster — Elastic cluster provisioning tool (GPL-3.0 License)
This is Part 1 of the Omicslab series on building Slurm HPC clusters. Continue to Part 2 to learn about production deployment with Ansible.